Page 18 of 33 FirstFirst ... 8131415161718192021222328 ... LastLast
Results 171 to 180 of 321

Thread: Sandcrawler project

  1. #171
    woy...collokweee...weeble weeble blaaaat artoodeeto's Avatar
    Join Date
    Oct 2009
    Location
    Simi Valley, California, USA
    Posts
    1,075

    Default Re: Sandcrawler project

    Quote Originally Posted by x88x View Post
    I'm gonna guess the new pump placement made it easier to come down to hit the various blocks?

    Looking at it set up now, I had a thought. For a fill point, you could just turn it on end with the end that that pump is on at the bottom, and use the plugged holes at the 'top' of the reservoirs.

    Looks great! ..though, I would replace the hinge holding the two res' together with somethings else if I were you...
    Nice guess! That was a thought that occurred to me around 1am this morning, before I realized I had to move the pump for a different reason. Still, hose locating will be easier with this pump placement, definitely. what's funny is I knew the reason it had to be on that side a long time ago, then forgot and thought, gee it'd be nice to have it on the side that faces out so you can open the panel and see it...and that thought carried me through til early this morning when I remembered why it had to be on the other side. Here's a further hint - take a look at the 5th and 6th photos on page 14...and remember the top part of the case has to go straight up and down when I put it on the base.

    As for the hinge...yeah. It was one I pulled out of somewhere else in the case when making room for the rad and res's. I need to get over to the hardware store and find something else. The hinge was all I had in a pinch. And for filling, the res mount is loosely held on with a couple screws, so I can pretty easily pull it loose, stand it up and use those 2 top fill holes on them.

    Quote Originally Posted by Waynio View Post
    It looks awesome m8, looks like a new type of snow walker sometimes with themed cases the insides look a bit of a nightmare to work with but this is looking great artoo +rep for brilliant insides & outside .
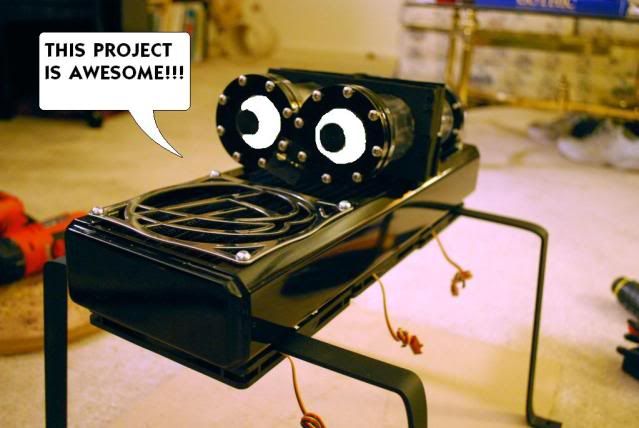
    Thanks man! I agree, the rad, res's, and mount do rather resemble some kind of freaky insect thing. their placement will make swapping out cards something of a pain, but on the other hand it only blocks the major stuff, which if I were to change it would entail draining the WC loop and going to lots of trouble anyway. So really, it's not that bad. I'll keep telling myself that, maybe I'll start to believe it LOL.
    Quote Originally Posted by ElevateThis View Post
    I'd mod my dog if i could.
    Quote Originally Posted by AmEv View Post
    (Steam me.... that sounds bad >_<)

  2. #172
    Will YOU be ready when the zombies rise? x88x's Avatar
    Join Date
    Oct 2008
    Location
    MD, USA
    Posts
    6,334

    Default Re: Sandcrawler project

    Quote Originally Posted by artoodeeto View Post
    And for filling, the res mount is loosely held on with a couple screws, so I can pretty easily pull it loose, stand it up and use those 2 top fill holes on them.
    Ah, ok, that makes it a lot more convenient, especially with a case that big. Oooh, you should put the whole res mount on hinges so you can just undo two screws, then tilt both up on a hinged arm. On the plus side, it would mean you won't have to hold them in place while you fill the loop (a process that at least for me always takes a lot longer than I expect it to).
    That we enjoy great advantages from the inventions of others, we should be glad of an opportunity to serve others by any invention of ours, and this we should do freely and generously.
    --Benjamin Franklin
    TBCS 5TB Club :: coilgun :: bench PSU :: mightyMite :: Zeus :: E15 Magna EV

  3. #173
    woy...collokweee...weeble weeble blaaaat artoodeeto's Avatar
    Join Date
    Oct 2009
    Location
    Simi Valley, California, USA
    Posts
    1,075

    Default Re: Sandcrawler project

    Quote Originally Posted by x88x View Post
    Ah, ok, that makes it a lot more convenient, especially with a case that big. Oooh, you should put the whole res mount on hinges so you can just undo two screws, then tilt both up on a hinged arm. On the plus side, it would mean you won't have to hold them in place while you fill the loop (a process that at least for me always takes a lot longer than I expect it to).
    Now THAT's a good idea Something like that had crossed my mind before, but something in the way you phrased it made a visual sorta click in my head. I'll be headed over to the hardware store after work, I know exactly how I'm going to do that. I just hope that once the tubes are on there, they won't get in the way of the hinging mechanism.
    Quote Originally Posted by ElevateThis View Post
    I'd mod my dog if i could.
    Quote Originally Posted by AmEv View Post
    (Steam me.... that sounds bad >_<)

  4. #174
    woy...collokweee...weeble weeble blaaaat artoodeeto's Avatar
    Join Date
    Oct 2009
    Location
    Simi Valley, California, USA
    Posts
    1,075

    Default Re: Sandcrawler project

    Thanks to X88X's suggestion, this is what I did last night:

    the basic idea...


    A further mock-up:


    My new piece of flatbar doesn’t stand a chance! Interesting side note – I discovered that the titanium coated drill bits really DO make a difference when drilling metal. Who knew? Man…wish I had a workbench. The towel is to minimize noise transfer to the apartment below.


    You’ve heard of donut holes? Well, this is the same idea, just aluminum.


    Using a large drill bit to debur the hole works quite well! The metal bar is too thin to countersink, so I only drilled enough to debur.


    These little guys will replace the hinges holding the 2 res’s together. Unfortunately I couldn’t get small enough flat braces, so I had to get the corner brace version. I started hacksawing one apart last night, but it was too noisy so I’ll tackle it when I get home tonight.


    Priming the new bars.


    And after a coat of black paint:


    The finished hinging system:


    What’s that you say? Doesn’t look much different than before? Well, how about THIS little trick:


    Now, once I get the tubes on there it won’t lift up quite that far, so I’m going to, at least for the moment, use one of the 20 some-odd 5” long screws I bought and prop this assembly up like a car hood for filling.

    Just one final step. I bought some thin foam rubber to put between the pump and metal bars to minimize vibrational noise. I needed about 8 square inches, if that. I bought a square foot of the stuff. So I used a little of the extra. Had to scrape some of my pretty paint job off the bottom of the bars…


    And then superglued the foam rubber onto the bottoms of each bar, to keep them from scratching up the radiator:


    That’s it for now…tonight’s task list is cut down the corner braces so I can replace the ugly hinges on the res’s, install the waterblocks, install the tubing, fill it all, and leak test…

    BTW – the reason I had to move the pump - I have that internal "engine room" whose floor I cut a hole in to show the PSU when the side cutaway flap is open. But with the pump over the PSU, I would have had to cut away the entire lower floor, most of a wall, and the upper floor so I could lower the top of the model down onto the base. On the other side I only have to cut out part of an upper floor to make room for the pump, since there is no lower section. I didn't do a lower room there because the boxed PSU *used* to be on that side, and now that the outside of the model is done the last thing I'm going to do is cut another hole in it, even though I do have space for a matching engine room now.
    Quote Originally Posted by ElevateThis View Post
    I'd mod my dog if i could.
    Quote Originally Posted by AmEv View Post
    (Steam me.... that sounds bad >_<)

  5. #175
    Why must hard drives fail together? TheMainMan's Avatar
    Join Date
    May 2008
    Location
    Canada
    Posts
    804

    Default Re: Sandcrawler project

    This is what I originally saw when I looked at the watercooling rack...
    ...though I do see how it could look like a modified AT-AT too. Love the creativity and it's great to see Star Wars lovingly rendered in a mod!
    Keep up the great work!
    TheMainMan

  6. #176
    Will YOU be ready when the zombies rise? x88x's Avatar
    Join Date
    Oct 2008
    Location
    MD, USA
    Posts
    6,334

    Default Re: Sandcrawler project

    Hahahaha, nice.

    Great work on the hinge; glad I could provide inspiration.
    That we enjoy great advantages from the inventions of others, we should be glad of an opportunity to serve others by any invention of ours, and this we should do freely and generously.
    --Benjamin Franklin
    TBCS 5TB Club :: coilgun :: bench PSU :: mightyMite :: Zeus :: E15 Magna EV

  7. #177
    woy...collokweee...weeble weeble blaaaat artoodeeto's Avatar
    Join Date
    Oct 2009
    Location
    Simi Valley, California, USA
    Posts
    1,075

    Default Re: Sandcrawler project

    Last night was once again busy. Let’s get started, shall we?
    First up – replacing those pesky hinges holding the res’s together. Remember that corner brace? Here it is, cut down to size, painted black, and screwed onto the reservoir. Almost can’t tell it’s there:


    Next up – there’s 3 fans. But I only have one plug on my Zalman fan speed controller. I don’t want to snip the fans’ actual wires, so I’m going to solder 3 connectors together and then to a single plug:


    The patient:


    Let’s get those heatsinks off!
    Most of the thermal paste stuck to the heatsink, but I still had to scrape some off.


    Mistakenly thought I had to pull everything apart (didn’t realize the backplate under the CPU had screw threads embedded in it):


    Added the mounting rods. That little vertical fan came with the motherboard and is specifically intended for use when a waterblock is on the CPU. I used duplicates of that fan on the outside of the case…and now I’m real glad I didn’t alter the original!


    Never has a library card been more useful! Well, an LA County one at least (the fiction selection at the local library is abysmal)…let’s start scraping off the old thermal paste and smoothing out the new!


    And adding the CPU waterblock:


    My GTX285 after cleaning off dust, thermal grease, etc:


    Copper + shiny =


    Scrape scrape scrape…


    Nice and smooth! Mostly…


    The installed waterblocks:


    Now it’s time to move on to the tubing! 3/8”ID clear tygon tubing. I started with 6 feet. I think I had maybe 20 inches left over by the time I was done, about what I expected.


    Oh man…I KNEW this fit was gonna be close, but wowee that’s pushing it! Amazingly the fan above the GPU block DOES spin freely. A millimeter lower and it wouldn’t…


    What I came up with to prop up the res’s as high as they can go (I will have to pull them off the hinge arm to finish filling them up though, so the hinge idea mostly worked). It’s a 1.25” screw, nut, corner brace, and another 1.25” screw.


    Now for the FUN part:
    When I contacted Danger Den about the sponsorship, I told them I’d like a second pump but as it was just for looks, it didn’t need to be functional. When I got the pump, it looked brand new, and was a newer version of the other one I’d gotten from Outoftheboxmods, so I decided to use it. I put the acrylic top on last week, tightened it, and then today started filling the system with coolant. Apparently either I tightened the top too much or Danger Den really did send me a nonfunctioning pump. When I turned on the power….nothing. I grabbed the other pump, tried to plug it in, and discovered that it had the wrong gender plug attached…I was getting irritated now, not to mention late for work. So I popped that plug off (luckily it wasn’t soldered), and stuck the black and yellow wires into the available molex connector. Voila! A working pump! But…as I’d partially filled the loop, I had to drain it to switch pumps. So, switched the plugs on the ends of the res’s with extra compression fittings, grabbed the extra bit of clear tubing, snipped off a short piece of the green tubing that I didn’t use, ran the clear tubing to the coolant bottle and shoved the nozzle of my air compressor hose into the green tube. After a minute or two I’d drained it enough to switch pumps:


    Now for the second embarrassing part…so these acrylic tops for the pumps have a top opening as well. The one from Outoftheboxmods had been used as a T-line before, so it had 3 compression fittings on it. The one from Danger Den had 2 fittings a plug. I was distracted enough that I didn’t unscrew the plug from the nonfunctional DD pump and so the functioning pump had a hole in the top. When I tilted the res’s back up to resume filling….burble burble SPLASH. Good thing I moved the pump so it wasn’t over the PSU!! The mess was easily mopped up, thankfully didn’t get on the carpet. I screwed the plug into the top, tilted the res’s, and refilled.

    It’s mostly full now, full enough to leave it running for leak testing purposes. I’ll finish filling it tonight, hopefully most of the miniscule air bubbles will be in the two res’s by then and not trapped in the tubing.


    The stains on the paper towel are from the top plugs on one of the res’s not being quite tight enough. The system itself isn’t leaking at all now.

    Sometime tomorrow I’ll plug the power back into the mainboard, and I’ll have a functioning water cooled sandcrawler.
    Quote Originally Posted by ElevateThis View Post
    I'd mod my dog if i could.
    Quote Originally Posted by AmEv View Post
    (Steam me.... that sounds bad >_<)

  8. #178
    Will YOU be ready when the zombies rise? x88x's Avatar
    Join Date
    Oct 2008
    Location
    MD, USA
    Posts
    6,334

    Default Re: Sandcrawler project

    Don't feel too bad, we all do stupid stuff our first time. It's a good thing that coolant missed your carpet though; that stuff leaves nasty stains.
    That we enjoy great advantages from the inventions of others, we should be glad of an opportunity to serve others by any invention of ours, and this we should do freely and generously.
    --Benjamin Franklin
    TBCS 5TB Club :: coilgun :: bench PSU :: mightyMite :: Zeus :: E15 Magna EV

  9. #179
    woy...collokweee...weeble weeble blaaaat artoodeeto's Avatar
    Join Date
    Oct 2009
    Location
    Simi Valley, California, USA
    Posts
    1,075

    Default Re: Sandcrawler project

    After about 30 hours of leak testing (mainly because I just left it running and didn’t have time before this evening to get back to it) the water cooled sandcrawler is fully functional!
    I’m using speedfan to view temps.
    The GTX285 GPU seems stable at around 50C, which is a good deal cooler than the 70-ish C it used to run at. The CPU…grrr. Seems to be right around 40C, haven’t tried any games yet but the highest it spiked so far is 47C when launching photoshop (subsequent launches of it spiked to 43C). I’m thinking it’s warmer because I have it on the same loop as the GPU, which gets pretty hot. I’m not completely sure what’s what though – I’m assuming Core is the CPU; GPU is the only one definitively labeled.


    What made it harder than just pulling the paperclip off the PSU m/b plug and hooking all the power plugs back up was that the pump, as you might recall, had the wrong gender plug on it. So I had pulled that plug off and jammed the exposed wires into the only molex connector in the computer, the one I’d been using to power the lights. I didn’t have a pass-through molex connector, and I was going to use an extension plug set and wire the pump into the middle of those wires, but I didn’t really want it drawing current from the same connection used for the lights…they’re dim enough as it is.
    Just to complicate things, as you can see in the next couple photos, it’s a hellish wiring mess back there:


    I ended up using what I think was a PCI-E video card power plug-to-molex adapter, which wasn’t wired quite right but I figured out what was what and soldered the pump’s wires to an extra molex plug accordingly. I then had to lift the radiator assembly up and scoot it over so I could lift the back end of the motherboard up and stick the new power plug for the pump into the modular set of power plugs for the PSU…I’d meant to mount it slightly behind the mobo but it ended up underneath instead. Not really a problem til now, but it wasn’t too hard.


    Amazingly, I used less than 1 bottle of coolant. I figured with two 2” diam x 7” long reservoirs, a triple 120mm fan radiator, two waterblocks and nearly 5 feet of tubing, that would take slightly more than a liter. But nope. Slightly less.


    My dual Danger Den RAD-Reservoirs. I highly recommend these – they’re really nice looking res’s, big, and extremely sturdily built. There’s a few air bubbles kicking around in there, but I can live with them. It’s either that or top them off to the point that coolant is spilling out. I had to use an eyedropper to top off the 2 res’s while holding them vertically with the other hand.


    The view under the rad, looking at the back of the video card.


    These hoses’ location has me a little nervous about putting the top of the model back on. I think I’ll try and zip-tie the furthest one out to something to rein it in a bit – it looks to me like where it is now, it’ll block the top from going all the way down onto the base.


    Not a lot of clearance under there, but just enough. Those low profile fans go a max of 1600 rpm, and I have them on a speed control knob. Not sure what the low speed is.


    I’m also thinking about sticking a UV cathode in there somewhere – the coolant is the black/blue Feser, which should look neat if I can figure out a spot to mount the cathode…
    Quote Originally Posted by ElevateThis View Post
    I'd mod my dog if i could.
    Quote Originally Posted by AmEv View Post
    (Steam me.... that sounds bad >_<)

  10. #180
    Will YOU be ready when the zombies rise? x88x's Avatar
    Join Date
    Oct 2008
    Location
    MD, USA
    Posts
    6,334

    Default Re: Sandcrawler project

    Looks great. You might want to also secure those PCIe power leads to something, just to make sure they don't flex into the path of the fan.

    I'm not sure if it's normal, but I had the same thing happen with my CPU temps; GPU temps dropped 30-40C, but CPU temps went up ~5-10C. I was worried at first, but as you're seeing, the temp delta is nothing compared to air cooling. Yeah, it might idle at 50C, but if the max it ever hits is 57C, I can live with it.
    That we enjoy great advantages from the inventions of others, we should be glad of an opportunity to serve others by any invention of ours, and this we should do freely and generously.
    --Benjamin Franklin
    TBCS 5TB Club :: coilgun :: bench PSU :: mightyMite :: Zeus :: E15 Magna EV

Posting Permissions

  • You may not post new threads
  • You may not post replies
  • You may not post attachments
  • You may not edit your posts
  •