I'm pretty sure I could have added more weight too. I wasn't interested in finding the breaking point though. All I know, is that it's far stronger than I'll ever need.Originally Posted by Luthien


I'm pretty sure I could have added more weight too. I wasn't interested in finding the breaking point though. All I know, is that it's far stronger than I'll ever need.
Okay guys, I'm looking to live stream some work tonight. It will most likely be between 8~11pm central standard time. You can catch the stream at either of the following two links. One is on my site, the other is on the Livestream site. Either will be the same, and commenting during the stream is easy, although I won't likely respond to much until I'm done working.
http://losias.net/losias-live/
http://www.livestream.com/losiastechnologies
Since I do things on the fly, I usually record in segments. It keeps the filler and wasted screen time to a minimum. Also, no one really wants to sit down and watch a 2 hour video. I try to keep most under 30 minutes.
So, you can feel free to check either link at your convenience. Also, one of the easiest ways to see when I'm streaming is to follow my twitter feed. It's @craigbru'. I usually send a message when I'm about to go live.
Tonight I plan on finishing up the rest of my case holes!
I got about 2 hours worth of streaming in last night guys. Unfortunately I've got no still pictures of my progress. I did manage to get the other hole for the LCD circuit board done, as well as the hole in the top of the case. I've got one more hole to put in the left side for the PSU, and then a small hole in the bottom of the case for ventilation on the pico-itx board that will be located there.
http://livestre.am/glpt
http://livestre.am/gl6b
http://livestre.am/gkTY
Someone at XS asked me for an overview of how the wireless networking and control was set up in this machine. Since I took the time to answer him there, I thought I'd post it here as well for those that might be interested.
Okay, here's a brief overview of the wireless networking and monitoring setup. It's sometimes a little hard to wrap your head around, but I'll try and give a clear explanation.
I've basically got 3 complete computer systems in this case. I've got the main system consisting of the Asus matx board and associated components. Then I've got a Via pico-itx system acting as an always-on file server, and information monitor. Finally, I've got the Viliv UMPC that sits on the front of the case. These 3 systems are connected by both an internal ethernet hub, and an Asus wireless access point. The wireless network is used for information sharing and control by the Viliv. The Viliv is obviously a wireless only connection, but the other systems can connect either wired or wireless, and be independent of any other system.
Since the pico is always on, it serves to relay most of the system information. It will be attached to an Aquaero and Multiswitch, which in turn is responsible for all watercooling, temp sensors, and lighting. It will also allow me to turn the main system on and off through the Viliv. All the information I need on the Viliv will be relayed using a Samurize front end. Samurize's own network monitoring functionality, as well as the Aquaero software will allow for real time monitoring of the pico and main system functions. Now, of course since the Viliv is wireless, and always connected to the OSIDIAS network, I can just detach it from the case and use it as a remote.
Does that help explain things a little? Feel free to ask if it doesn't.


That...is gonna be awesome.
TBCS 5TB Club :: coilgun :: bench PSU :: mightyMite :: Zeus :: E15 Magna EVThat we enjoy great advantages from the inventions of others, we should be glad of an opportunity to serve others by any invention of ours, and this we should do freely and generously.
--Benjamin Franklin
Thanks bro!
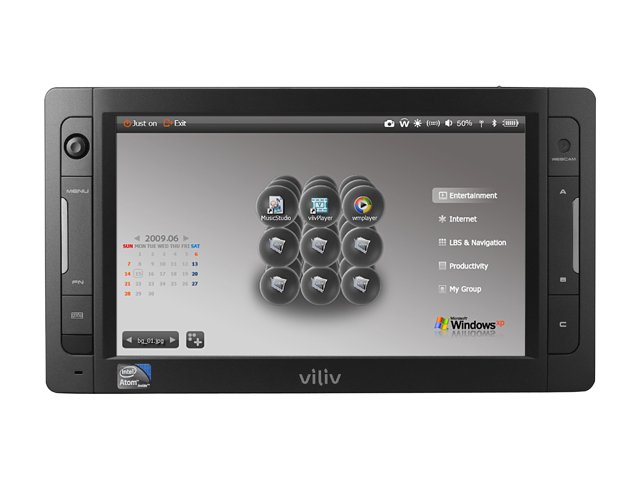
One more thing... It's just occurred to me that there are probably quite a few of you who didn't see my planning thread for this project. If that's the case, you may have a few questions about the Viliv UMPC that I mentioned above. To allay any confusion, below is a pic and a link.
http://www.myviliv.com/eng/product/x70ex.asp
Thanks to inspiration from Javi, dbradford, and w33dy at the Mod Brothers forums, I've done a little something to help with my dust collection. I really needed a third hand when cutting on the workbench, and with none in sight, I came up with a great alternative. I modded an old architect lamp!
I couple of velcro straps, and the vac hose was attached to end of the arm. After using it for a few cuts, I've got to say that it's quite effective for a low tech solution. I'm guessing it's catching at least 75% of the dust caused by cutting.
So, with a decent dust collection solution in place, it was time to put it to use. I was streaming live during a portion of this, so I'm missing a few pics. With most of the side holes done, it was time to move to the top. Here is what it looked like after cutting.
Now it's time to move back the side. The last hole I need to cut is where the PSU will sit. Here is the hole all marked out. (Live Stream)
All cut! (Live Stream)
And finally a test fit with a PSU in place.

This is looking sweetkeep the updates coming
Thanks man!
Update time! Today we pick up with the start of the interior assembly. Since I'm a glutton for punishment, I've decided to make the entire thing out of a single piece of molded carbon fiber. Since the dimensions have to be perfect, I am going to be using a two part mold. An inner and outer layer, with the CF sandwiched in between. In order to pull this off, I've got to do some very careful measurements, and even better cutting.
I'll be using 1.5mm aluminum for the molds. Here you can see a 4' piece marked down the center. I should be able to get both an inner and outer mold out of this 2'x4' sheet.
Next up I've got to mark out all my cut and bend lines. There is no room for error here. Everything is down to the millimeter.
After the rough cuts were made...
After spending a maddening long time with the aluminum in my metal brake, I was left with the following. Mind you this was a little tricky, since it didn't exactly fit in there very well after the first few bends...
Now it was time to stick it inside the case for a test fit. I had no doubt everything would line up, but it's always a good idea to double check.
Next up is the outer mold. Once that is completed, I'll rub down the aluminum with release wax, and play with a little more carbon fiber. Woohoo!
Also, as of this morning, I've learned that OSIDIAS was nominated for bit-tech mod of the month! I'm honored!
http://www.bit-tech.net/modding/mod-...th-july-2010/1


nice work! and congrats on the nomination!!
Arctic Cat * Maximum Security * Cribbage Board * Rockin Case * Armor Redux
Tempest SXR * Power House * Red Comet * ICHIWZ * Acrylic Headphone Hook
Continuing sponsorship support from PCBoard.ca
 Posting Permissions

 Reply With Quote