Sounds good. Good luck. can't wait for the finished product.


Sounds good. Good luck. can't wait for the finished product.
Project: Elegant-Li *NEW*
Project: Alpha FINISHED
Project: LEXA Revival FINISHED
Project: LEXA FINISHED Bit-Tech MOTM Nominee October 08
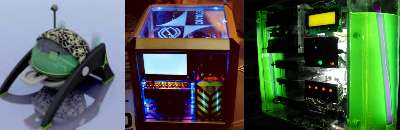
that layered shot of the EL wire blew my mind, nice job
Intel Pent D 2.66Ghz| 2Gigs| 18x DVD-RW| 200, 40 GB| 550W ATX| Zalman 9500

great job on the EL wire, keep up the great work!

Thanks for your comments. I was able to borrow an air compressor and dual action air brush from a friend, Now I have to learn how to use it.

Verry stylish project! +rep
I like the idea and the design of the surface.
Also the idea with the glowire is great, but why do you change the design on the second layer? All other cutouts are very accurate and look symmetric but the second layer looks like you glued on the pieces left over from former work in a cluttered way... Or is it only for testing the glow effect?
LOL, No its not the left overs from the bottom section. Its meant look like that. Think of an futureistic jet engine with lots of layers, wires, parts etc. So it is meant to look "cluttered" and non-uniform. The bottom is different because its a completley different part of the turbine. It is meant to look like the fuel pod for the engine with the tubes comming up into the top back part to feed the jet. Get it?
Up date next after my pics upload...
ok, here we go...
I finished doing right side of the turbine tube:
Here is a close up:
Then I moved to the other side:
Here it is finished.
The glow wire on the window side will follow the shape of the window and be concealed by a trim ring. I still have to add a little detail to its surface and I can't install it untill I get it painted:
Speaking of paint. I started to mask off the 3 light bars on the tube. I had to cut a long strip of masking tape to a very thin piece, so I used my stripe cutter from my Airplane modeling days.
here is a piece of mask on the top section:
I finished the other 2 sections with mask and now its ready for paint.
My son's birthday is tomorrow so I probably won't get anything done untill after he goes to bed, So I may or may not have another update tomorrow night.
Later,
Okay, got itSorry it my post sounded a little harsh. With more layers and pieces the effect comes out better.
That stripe-cutting-machine is a nice tool, cant wait to see the turbine painted!
Happy birthday to your son.

This is by far one of the best worklogs I've seen on this site. I'm very anxious to see it finished. Great work, awesome idea. LOVE IT!!
+rep
I reject your reality and substitute my own
NQ, thats ok, no offense taken.
Thanks for the reps and positive comments guys!
Here we go again,
Ask and you shall receive, you wanted to see it painted, here it is in black. BORING black base coat. I have a lot more air brushing to do, but for now I just applied the base coat.
While the body was drying I turned my attention to the supports for the resevoir inside. I cut and glued up some strips of plastic.
Then I used my dremel and a sanding drum to rough out the shape:
The shape is meant to look kind of like an airplane wing so air will flow smoothly around them.
I covered it in fine filler:
Then I used my straight edge sanding block to smooth it out:
here is the final piece:
I have to cut it into 6 sections to use around the resevoir. I also have to figure out how I'm going to attach them to the resevoir. so for now, thats it.
Cheers!
 Posting Permissions

 Reply With Quote