Page 1 of 2 12 LastLast
Results 1 to 10 of 12

Thread: Apps HyperNES-PC.. Enjoy

  1. #1
    Fresh Paint
    Join Date
    Apr 2013
    Location
    NC - USA
    Posts
    10

    Default Apps HyperNES-PC.. Enjoy

    So, I saw this video on YouTube by a guy going by the name "buddwm"

    Heres a link to his video.. >>Click ME<<

    I was stunned. Never before had I even CONSIDERED doing this. Hell, I've had my childhood NES since I was 12 yrs old! I even pull it out a few times a year and hook it up and play it till my wife is sick of seeing it.

    But this!... I build my own computers at home. My kids computers. Various friends... etc. I can do this!!

    With a little persuasion and some flowers to my wife, the project budget is established, and its "Green lights"

    I scoured YouTube for clues. Videos. How to's... and what I found was a ton of @*%#. So, eff it! Let's just get crazy and see what happens.

    I get started... Below is a copy of posts and pictures and updates from a webforum for arcade style DIY projects called Hyperspin-fe

    Part way through my build, I found this guy...
    Youtube modsandends The Unassuming NES PC Tour

    Finally one NES-PC that wasn't garbage, or a shoebox.


    (If I have to split up posts for video or image count restrictions, I'll apologize in advance)

    The user "modsandends" suggested I post here the finished work. Sooo without further ado.

  2. #2
    Fresh Paint
    Join Date
    Apr 2013
    Location
    NC - USA
    Posts
    10

    Default Re: Apps HyperNES-PC.. Enjoy

    Heres the start. (links are to actual components)

    Hardware is:
    NES - Original from my childhood
    MoBo - Intel H61 Mini ITX DDR3 1600 Intel LGA 1155 Motherboards H61H2-I3 - from www.amazon.com
    CPU - Intel G530 CPU 2.40 GHZ 2M CACHE 2.4 2 LGA 1155 Processor - from www.amazon.com
    Power - Sabrent AD-LCD12 LCD Monitors 12V 6A 72W AC Adapter Power Supply - from www.amazon.com
    and... - PicoPSU-90, Cyncronix 90W 12V DC-DC ATX mini-ITX - from www.amazon.com
    RAM - 8GB DDR3 1333MHz - from previous computer originally from www.tigerdirect.com
    Controllers - (2) NES-USB Retrokit chips - from www.retrozone.com
    (1) 6' HDMI Cable

    The hardware is currently still in original packages, minus one USB controller chip.. I've already soldered it in to test it on another pc system.

    Software

    Hyperspin 1.2
    Xpadder for controller support in the emulator
    Nestopia NES emulator
    AVS Video Editor (for movie "magic")
    my Wife (yes, shes software not hardware)
    Tunebite (ripping audios apart)
    www.kyutwo.com for awesome pre cut sound files


    ********Update Section**********
    March 15th, 2013
    The software is nearly complete with the database in order of the games I own only. Pared down to the NES only. Hardware is untouched. Intro Video for Hyperspin is "rough draft". And exit audio is selected. See below.


    Please feel free to comment and make suggestions. I'd greatly appreciate them.

    ~App


    Exit Audio

    http://www.kyutwo.com/downloads/sfx/...m_nintendo.mp3


    ********Update**********
    April 10th, 2013

    The system is alive! After a lot of hair pulling, and frustration of how to cram 20 lbs of crap into a 10 lb bucket, a DOA PicoPSU, An incompatible Power brick port, and various software problems.. I've finally gotten the system to boot up, and operate like any other normal PC... all inside a NES Shell.

    Few things I would have done differently.
    1. Make a paper layout of the motherboard, and laid it down inside the shell bottom, to use when manhandling the shell for position and hole placement. I could have easily damaged the motherboard or other components.
    2. Doing the above.. I could have avoided a lot of unnecessary cutting.
    3. Buy the nice solder. Its a few bucks more, and even with a decent soldering iron, its difficult.
    4. Buy the soldering helpful mount. (its the thing that has two articulating arms that you can clamp wires or work pieces to, so you have two free hands to solder.
    5. Test the equipment before starting the project for defects.
    6. Not attempted to load the software onto the SSD before firing the Motherboard with it.

    ********Update**********
    April 11th, 2013

    Its ALIVE! System is operational / functional. I simply transferred all the Hyperspin, emulator, and supporting files via USB flash drive, after I got everything exactly how I want it (all working from the regular desktop PC). I can now see a list of things that are left to clean up the system.
    Receive and mount the controller ports
    Receive and mount the HDMI port
    Extend the Power wires, and solder into the OEM port
    Extract and mount the cartridge elevator tray
    Modify my Zelda cartridge, and mount the SSD
    Wet-sand and repaint the housing.

    ********Update**********
    April 14th, 2013

    Soft taps played in the distance. I cut apart my Original.. yes! the one I bought when I was 12... Original Legend of Zelda cartridge. The time finally came to get the SSD in the system in a more permanent fashion. I got the elevator tray installed. That was incredibly easy. I simply removed it from the original casing, springs, and pop it out... Then I cut off the locking mechanism for the tray; lined it up in the top half, and hot glued it in. A LOT of hot glue. lol. The Power wires needed to be extended so I cut off the port that comes with the PicoPSU-90, and instead desoldered the I/O module from the original NES, gutted it, and used the OEM hardware. System looks nice and clean from the outside. Im very happy with the result.

    ********Update**********
    April 15th, 2013

    USB retro kits and HDMI port arrived! I spent far too much time working on this. I am overly careful seeing how as Buddman indicated he had received a bad batch of chips once, and needed help with the soldering. Heeding that unintention or intentional warning, it took me about 4 hours to get the two controller ports wired up to a USB controller chip. (Helpful Hint!: The Blue and Purple wires are not needed for the standard controller. They are used for the Light Gun. Which won't work for the retrousb chip kit... so I just cut them and tied them off to the side.) One thing I haven't really talked about is the software setup, database, and the setup for XPadder. Needless to say, I also spent 30 mins reconfiguring HyperHQ, and XPadder and NEStopia to properly recognize the new USB controllers. Also, I modified one of my OEM controllers to add a LED. It looks really nice. I'd definitely recommend it to anyone building a NES-PC.

  3. #3
    Fresh Paint
    Join Date
    Apr 2013
    Location
    NC - USA
    Posts
    10

    Default Re: Apps HyperNES-PC.. Enjoy

    I had to make some slight modifications. And I'll explain why below. Yet, with a sick 18 mo old, and a family vacation earlier this month, my progress has slowed somewhat. As of today, I have a functioning PC inside a NES housing. Somewhat crude for the dremel work, however this is my first custom / mod project... like ... ever.

    First photo is of the hardware and layout of everything I have. From left to right, and top to bottom.. Some heat shrink tubing (to cover the horrid soldering work Im still learning as Im doing), Elitegroup Mini-ITX motherboard. Aux case fan (not used...yet) and 3ft. HDMI cable for test purposes. NES shell. 90W computer Monitor power brick. PicoPSU-90 with power port already wired on the board. Intel Celeron CPU. Some JB Weld... what!? you know you'd use it too. Kingston 96GB SSD, and a single stick 4GB of DDR3 RAM.


    Now, this wasn't shown, but the power button presented a problem since the original power switch isn't a momentary switch. Rather its a spring toggle switch. Easily converted by removing the cover and taking out the mechanical toggle. I needed to de-solder the board that the switches were mounted onto, and then use some spare PC case wires that my local PC parts store kindly gave me for free. I soldered the wires on (terribly), and shrink wrapped them for a more secure and cosmetic look. The LED is also from the same case plugs.. I simply put it in, and hot glued it into place. Tested the switch... Realized I got the ground backwards on the power. (Helpful note! Ground for the power switch is INVERTED from the reset switch!)


    Here I am hacking away at the bottom of the NES shell case. Allow me to explain what we see here.

    The "slot" cut out of the left side is to allow clearance for the RAM thats mounted on the motherboard... yep, I had to flip the motherboard upside down... Hence the large hole. Also, the Left most plastic mounting boss, thats adjacent to the side wall and bottom, had to be cut and removed completely after this photo was taken due to the wires that come off of the PicoPSU-90 were 90° angles and needed a slight bend to curve upwards... It just so happened that when the motherboard was mounted, thats EXACTLY where the wires ended up... awesome -_- Of course the large hole is for the CPU fan, and the additional slot removal to the middle area is clearance for the PS2 ports on the motherboard. (Helpful note! I *could* have de-soldered the PS2 also, and according to the local PC parts store service manager, said it shouldnt make any difference for the boards operation, buuuuut, since this was my first attempt, I didnt want to take the chance that he could be wrong. If I had removed it, I wouldnt have needed to remove that section of plastic at all... FYI)


    In this photo, you can see some of the assembly beginning to take shape. Yes,... thats a hacksaw in the top right of the photo. You may also notice in the case, there is a mounting bolt in the lower left corner mounted in the case... I'll get to those in the next photo. Needless to say, I hadn't even tried to fire up the system yet and check components. Hindsight... (Helpful note! Probably a good idea to test all your hardware when it arrives, to avoid missing any potential DOA situations and miss the return window, if your projects take as long as mine do.) At this point, I was attempting to figure out just how to get the damned thing to fit inside, and make it so that when you open the door of the upper housing, you didn't see a bunch of crap.


    And last photo for this update...

    The lower housing, with mounting hardware installed. This was a lot of trial and error to get the spacing right. Always marking via putting a nail through the hole, and then marking the nail tip location with a sharpie.. triple checking the vertical plumb of the nail. The mounting hardware serves two purposes. 1. The CPU fan was exposed out the bottom by 0.250" and was beyond the length of the case foot pads... thus the fan rested on the surface, and the foot pads did nothing. Soooooo. I'm using a #6-32 piece of all thread, ~2.250" long X 4 pieces. There is a Plastic Lock Nut on the bottom that secures the other side. Its a Plastic Lock Nut, washer, then the plastic housing, another washer, and a plain #6-32 nut. After that, (what you dont see here is..) I used another plastic locking nut, and ran it upside down from the top of the all thread (shown), down about 0.250". The motherboard sits on top of those for a solid firm hold and gets the position precise enough to give adequate room for the plans in the top half. Once the motherboard is on, another washer and then standard #6-32 nut to secure it.


    I'll post some more photos, and even the video of the first couple tests... (spoiler:... it didnt go so well)

    ~App

  4. #4
    Fresh Paint
    Join Date
    Apr 2013
    Location
    NC - USA
    Posts
    10

    Default Re: Apps HyperNES-PC.. Enjoy

    Made some really nice progress yesterday evening. The system is operation / functional. Even played a few games with my kids on it. I still need to disassemble the Cartridge tray elevator and remount the black tray permanently with the game inside. I'll be cutting apart my Zelda game tomorrow. For now, I did a trial on a crappy golf game cartridge I had, just to test with.

    My retro game controller sockets aren't here yet, so, I'm using a direct wire USB controller just to continue to test the software and integration. The video I was working on, I wasn't happy with and in a fit of frustration and rage, deleted the project. I'll re-do the video this evening and post it.

    So... Pictures

    Here is the system, 95% assembled. I'm still lacking the cartridge elevator, game controller ports, and mounting the "dummy" rear OEM ports for the NES. I'm looking for suggestions on how to mount the HDMI.(Photo 1: Door closed; Photo 2: Door open; Photo 3: Cover removed)


    The next set of photos are pictures I took while doing the second power boot test. Image one shows the system wired with the power connector at the bottom of the image, and to the right of the unit, are the USB connections for keyboard and mouse. And whats hard to see, is the HDMI port on the motherboard, being connected to the monitor. (oh! there are two monitors visible in this image. Only the left monitor is actually hooked up to the NES. The other is maintaining my regular custom built PC.


    Image two is a closeup view. Its a bit easier to see the motherboard mounted, LED power and reset assembly, the power adapter from the PICOPSU (black and white wires), the two USB for mouse and keyboard, SSD, and the HDMI port.


    Lastly.. for this update, you can see the "dummy" test cartridge in the "OUT" position and the "IN" position.... Helping to depict the amount of room still left inside the enclosure of the NES shell. Again, this is just a test cartridge. The SSD is mounted inside it....hmm I should take a few photos of that too.


    So, again, I'm looking for some input or advice on how to mount an extension for the HDMI to the right side of the enclosure. I want to utilize the same little notch area as the original location of the video and audio RCA connectors. I will have to cut out the small web of plastic to fit the HDMI, but I'm ok with that. Currently I am looking at a 1ft panel mount HDMI extension cable... like this.


    Also, if anyone can point me in the right direction of how to disable or replace/modify the Windows 7 boot splash animation, that would be super awesome!

    ~App

  5. #5
    Fresh Paint
    Join Date
    Apr 2013
    Location
    NC - USA
    Posts
    10

    Default Re: Apps HyperNES-PC.. Enjoy

    Yesterday evening I didn't get a lot done. However, I have knocked another action item from my list.

    The elevator tray has been disassembled, modified, and mounted. Looks good.


    Also here are the pictures of the Game Case modification to get the SSD to fit. Note, I don't have the reverse star bit for my screwdriver kit, and am not willing to spend the $5.00 to order the unique tool, so I simply used a small drill bit, and raced around the perimeter of the countersink hole to weaken the plastic. Popped open the case, and then dremel work to clean up the space.


    Again, this is just a test case, to see how well this would work. I've also added some slots to the side of the elevator tray, and glued a small tab onto both sides of the cartridge top half so the cartridge can "slide" in and out some. It wont come all the way out, unless the system is disassembled.

    Guess its time to cut the Zelda case!!! O.o

  6. #6
    Fresh Paint
    Join Date
    Apr 2013
    Location
    NC - USA
    Posts
    10

    Default Re: Apps HyperNES-PC.. Enjoy

    On your mark.... Get set!...

    Not quite.

    The last of my components should be here today. This weekend I spent some time on this project, adding some small plastic washers as feet to extend the clearance of the system and help the fan exhaust a little easier. (Not that I have a heat issue, just didn't like the fan less than 1/8th from the surface.)

    I also cut my Zelda game cartridge (20 minutes of quite sobbing in a dark corner of the garage), and mounted the game and hard drive in the system... But.. before all of that...

    I was getting concerned with the requirements of modifying the systems outer appearances to use the new power jack and all the open holes. Yes, I could have pulled them off of the old NES board and hot glued them to the side, but, that just didn't feel like good engineering practices.

    So... Desoldering time!

    I disconnected the I/O module from the Original NES board, then disassembled it, and again desoldered the circuit board from the module housing. Note: all I/O devices ground to the housing by added solder, except for the Chanel 3-4 selector switch. I was forced to remove it completely. However I did use the same practice of affixing it to the module sides by means of added solder. Worked like a champ.


    I'll take a few more pictures this evening once the physical build is complete. For now, you'll simply have to take my word for it. I mounted the module inside the new system by means of the existing screw bosses, that I didn't completely remove. I then cut the connector off of the PicoPSU-90 then using solder and shrink wrap, wired it directly to the existing original NES power port.

    Right now, from an external standing, the ONLY thing that is NOT original is; the AV ports have been replaced by a HDMI socket. (Yes, the bottom is cut up all to hell, but the bottom isn't visible when in operation.)

    So hopefully, if all goes well tonight, I will be looking at paint. I plan to play the system with my kids for a few days and enjoy the hard work a bit, then disassemble the unit and paint it.

    Any tips on painting? I've never had to paint plastic before.

  7. #7
    Fresh Paint
    Join Date
    Apr 2013
    Location
    NC - USA
    Posts
    10

    Default Re: Apps HyperNES-PC.. Enjoy

    Total Fail on my follow through last night.

    I neglected to get some of the pictures I had intended, however my time was consumed by adding the new USB conversion chips, and modifying the Original NES Controller.

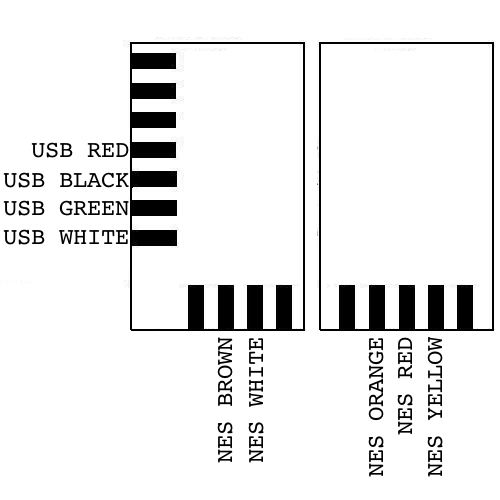
    To start with, I purchased USB conversion kits from www.retrousb.com . (Noted on the fist post) The actual parts purchased are linked here >>CLICK ME FOR USB RETRO KIT<<. There is a super nice instructional video by "Lauren" from RetroUSB.com that seriously put my soldering skill to shame.


    Using their wiring diagram, it was easy to install.


    I decided, rather than mod the controller, I would instead mod the controller port. This way, any OEM NES Controller will work. (I.e. you can bring your original controller over to my house, plug in and play.) In the photos below, you can see one port "P2", is already done and installed.. and I am wiring up the "P1" controller port.


    The kit comes with a long length of wire. ~ 3 ft. Thats too much for the small space for my build. So, I cut the length considerably and mechanically twisted the wires, then soldered them, then heat shrink was added to both the individual wire, and the entire wire once all 4 wires were spliced. (Yes, the first picture shows the "P2" with electrical tape. I later thought this looked trashy and was concerned, so I resoldered the joints using shrink wrap tubing.) I also put a single piece of electrical tape over the controller chip to add a little insulation from any stray wire, lose solder, or foreign object that could rattle around the system.


  8. #8
    Fresh Paint
    Join Date
    Apr 2013
    Location
    NC - USA
    Posts
    10

    Default Re: Apps HyperNES-PC.. Enjoy

    And here it is.

    My HyperNES.


    I'm doing the other controller LED mod this evening.

    Last night I played several games with my boys. Even played Ikari Warriors long enough to get sick of the A-B-B-A.

    So, this weekend I will begin practicing on a spare controller for paint. I have ordered a "Light Arrow" and a new "Nintendo - Nintendo Entertainment System" logos from
    http://www.javasigns.com/category/5165.

    I plan to repaint the system, then before the final clear coat goes on, apply the decals and then final clear coat over them. Depending on how long it will take me to master wet sanding and polish / buffing / painting / clear coating... I decided to bring this thread to a resolution. When I get the painting done, I'll post those pictures. For now, I am eyeing some MDF boards and some joystick kits on ebay.
    http://www.ebay.com/itm/HAPP-14-BUTT...-/380195640715
    Dunno anything about them or whether theyre good or not. But the first cabinet build should be a "Go".

    .. now I need to get my wife on board.

    Oh, in case anyone was wondering. Total cost of the system was ~$350. Includes, all PC hardware, software licenses, "How to Solder for Beginners" soldering kit, LED's and Resistors, Cables, Dremel cut off tools, spare controllers for testing on the PC, ..and some other misc hardware for mounting stuffs. I'm very pleased with the result.

    Thanks Hyperspin for an awesome product. The Hyperspin software really adds a nice 'KO' Punch to the system.

    App

  9. #9
    Fresh Paint
    Join Date
    Apr 2013
    Location
    NC - USA
    Posts
    10

    Default Re: Apps HyperNES-PC.. Enjoy

    Quote Originally Posted by markelhombre View Post
    Why do you want to paint this awesome system? Well, looking at you style of work, i can safely assume you've put thought into it, but i'm just curious. I'm sure i wouldn't paint it.
    I really have.

    I am a Professional Engineer working in the Plastics industry. The ABS material that the cases are made of during those years of plastics technology are very low grade polymers by todays standards. As such, the ABS material has no UV stabilizer protection in the chemical composition. Hence, the plastic turns yellow, and over time becomes brittle susceptible to chips and dings that are unsightly and irreparable.

    Today's paint can be purchased with molecular polymer chemical bonding agents and UV protectants as well as impact modifiers. It actually makes good sense to coat the system casing not only for aesthetics but safety and durability.

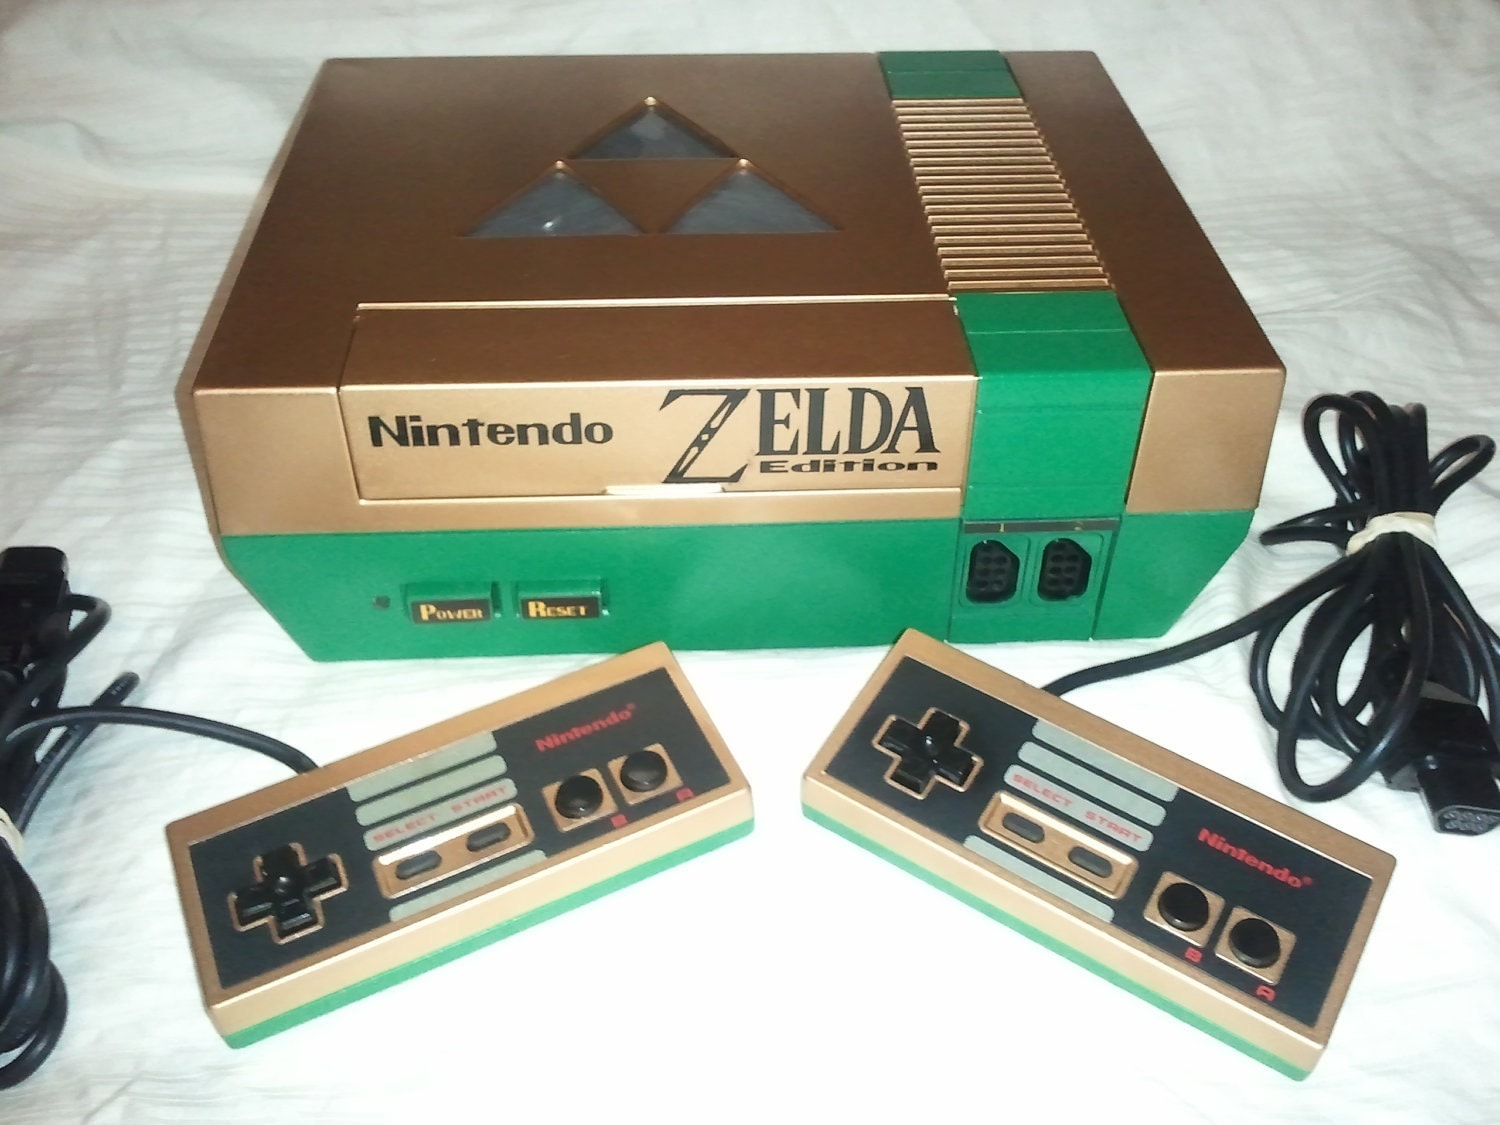
    Since I settled on protecting the case with paint, I was then left with .."what colors or color scheme to do?" And after seeing some other professional painters rendition of giving homage to the system, I was sold. Yet I concede... I am still unsure of either repainting it in original colors, the 25th anniversary colors, or a custom theme.

    Here are some photos of other peoples work. Specifically "Custom NES Guy" >>Link to CustomNESguy Facebook Page<<


    And my personal Favorite...


  10. #10
    Fresh Paint
    Join Date
    Apr 2013
    Location
    NC - USA
    Posts
    10

    Default Re: Apps HyperNES-PC.. Enjoy

    <reserved>


    Here is an example (NOT MINE) of the Hyperspin intro plus the Frontend software with emulation in the background.


Posting Permissions

  • You may not post new threads
  • You may not post replies
  • You may not post attachments
  • You may not edit your posts
  •