-
Re: Bärsärkar-gång
Thanks SXR!
You too Nutman! Yes I have the same worklog at a few other sites. I was curious about the motivation behind worklogging so I put it up on several sites to figure out what the advantages were. It's certainly gets the traffic numbers up which is good in some ways for sponsor statistics but it's a takes more time than I would have thought.
-
Re: Bärsärkar-gång
Ah! I meant RealRedRaider. Not Bit-Tech, hehe...
http://www.realredraider.com/vbullet...=14411&page=10
Given up on that worklog?
-
Re: Bärsärkar-gång
Yeah I had a copy on RRT too. I gave up on updating it awhile back.
-
Re: Bärsärkar-gång
Oh wow! Mach, you have come a long way since I last checked in here. Incredible work as always my friend. There are alot of modders out there and many of them extra-ordinarily talented but you have shown an even more rare set of abilities than most. That is a totally original style of craftsmanship and inspiring attention to detail. Hell, that is what put this site on the map in the first place with Doom3. Thanks for sharing the superb works of art with us man! And would'ya kindly keep it up?
Jon
-
Re: Bärsärkar-gång
Thanks Jon! I appreciate the compliments :redface: although I need to find more time to work on it. And yes, I'll keep it up...after all a man mods, and a parasite says "What will the neighbors think?". :whistler:
-
Re: Bärsärkar-gång
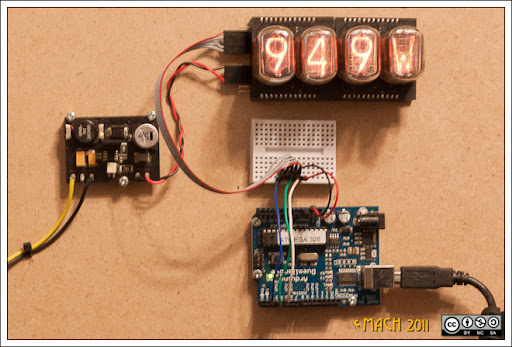
Woot! Nixies have arrived. Now the hard work begins but not just yet. I'm going to be out of pocket for the next few weeks until I get a couple of work projects finished but thought I'd leave you with this for the time being.
-
Re: Bärsärkar-gång
Mach, right now I feel this strange feeling as though I dislike you for having acquired nixies before me. However, I'm sure it will pass.
Nice setup, what's it do?
-
Re: Bärsärkar-gång
Nothing yet except rotate through the digits but add a few TI INA219 and some shunt resistors then you have some fun ;). Unfortunately these are IN-12s/15s which will be too big for what I have planned. I'll likely use IN-17s or 16s.
Oh yeah, please if you want to get this all figured out before me, I'm moving over in the slow lane so have it :). I'm more than happy to learn by example.
-
Re: Bärsärkar-gång
If I win this auction, I just blew my R&D budget for a bit. However, I'll have a nice new toy that will make every computer on this site quake in fear.
Even the 980X that Trace has.
-
Re: Bärsärkar-gång
Arise worklog! Arise I command thee!
That's right, its not just a post that goes bump in the night but a real life, honest to goodness update.
I would like to tell you a harrowing tale of my escape from alien captvity but the truth is much less exciting. I've mostly been trading time for money or as its commonly known, working.
Any free time that I've had has gone to making a photobooth for a friend's wedding. Much like this mod, it was a project that took on a life of its own.
Here it is on site being tested by one of the wedding guests. It was designed based on an instructables that I found. As the wedding was half way across the country, it had to be disassembeld and re-assembled for the event. A great deal of PVC later, we had a mobile photo booth that could hold 10 people at a time.
And the happy couple. Yes, there were costumes and much fun was had by all. :) But enough about that! Back to the modding.
The meter? Remember the meter? No? Allow me to recap, this is the meter that is interfaced with the motherboard to display temperature, HD capacity, ram usage, cpu load
.anything really that an arduino can be be coerced into outputting.
Finally got it finished.
After several attempts at painting the etched brass back, I finally got close to the look that I was chasing. Aged, weathered, and a little abused.
Looking back at the orginal cracked and peeling paint, its a little exagerated but I'm happy with it. This is what the meter looked like before.
Completed the wire sleeving using paracord. It's a pain in the butt to sleeve with but I like the contrasting look. I had to run two sleeves due to the number of wire. Still need to complete a final test and tighten up the threads under the supporting arm but that can wait for final assembly.
Changing topics, here's the original design for the motherboard tray.
And the laser cut brass piece. What's missing is the support brace on the back.
Revision 1 mocked up in polystyrene from the last decade :)
I've been dancing around what to do about this piece because the tolerances in the case are so tight. When I taped everything together, I could foresee some clearance trouble brewing.
As originally sketched up, The tolerance were already tight. Part of the challenge is getting everything to fit. I think it all will fit but I don't *know* it.
To counteract some of the unknown, the back mount is meant to slide. Yes, its a cheat but dont judge me too harshly my sketchup-foo was/is weak. ;) Literally, an 1/8" makes a difference, more on that below.,
My first attempts went pear shaped quickly with a propane torch. My skills at hard soldering were not up to task. As with most things in life though, I blamed my tools instead. With a newly acquired MAPP and oxygen torch in hand, I tried again. By sandwiching the brass between firebricks, I was able to raise the temp of the piece and get the silver solder to finally flow.
The discoloration is from heat and the borax flux.
Up close, not as pretty as it should be but I'm well pleased.
Into the pickle for clean-up. Anyone know what I'm making when I mix Sodium Bisulfate with Hydrogen Peroxide?
I'm assuming some variant of sulfuric acid as its much more aggressive than sodum bisulfate alone but the upside is that it doesn't turn the brass pink like normal pickle.
Oh, yeah, I love it when a plan comes together. Still needs further grinding and polishing but it'll work.
The "stack" is still tight.
The original plan had the brass fan grill fush against the back of the case. The design changed when I gutted the heater case and discovered the need for a new frame to support the case skin.
The rails that you see that arc over the top are that frame. To gain back the 1/8" that I lost with the addition of the rails.
I notched them so the fan grill would fit in between and then soldered the fan grill in place using soft solder. After filing and sanding, I got my 1/8" back. :)
With the fan and radiator fixed in place, I was able to finally lock down where the motherboard tray fits. A little drill and tap action and voila
It's starting to look more like a computer. By the way how do you like the brass/bronze washer combo on the screws? I'm thinking about carrying that look across the case.
Oh look, a wild Big Daddy appears. For reference, the figure is about 7 inches tall.
Thanks for looking and many thanks to my sponsors!
Bitspower
Galaxy
HardwareLabs