-
Tips for working with plexi/acrylic
Common terms
- Plexiglass, Perspex, plex, plexi, acrylic, all refer to the same chemical compound (Polymethyl methacrylate - PMMA). wich hence forth in this document shall be refered to as plex or plexi. Another compound known as lexan has a simaler appearance to plex however may handle diffrently. this document is intended for use with PMMA based products only.
Please note these tips are a in my own words summery version from what i understand of what was said all over the net. A link will be at the bottom to some conversation about this
*******Cutting*********
i have heard success using the folowing :
Drimel - use the cutting wheel. typicaly you hear that you should use a low rpm to cut as a high rpm has more of a tendancy to melt (so they say). i have recently heard otherwise so if you have some scraps test out whatever way you prefer to see what suits you best. Drawbacks of using the drimel is that the cutting wheel on this device works like a very fine grind stone and thusly cuts by friction resulting in the plex getting very hot and melting a little so cut a little wide of your lines. also due to this abbrasion meathod the edges of your cut will be not very clear. very scratched up and a pain to polish.
jig saw - I have never used one for this but from what i hear you need to use a fine tooth hacksaw blade. the edges left over will likely be alot less rough then with the drimmel. from what i can tell with this cutting meathod you could potentially chip the surface of your peice when the blade retracts. so make sure its a sharp blade. beyond that you should be carefull of the vibration here as if your blade binds up it could cause cracking.
score and break - This meathod is exatly what it sounds like. you make a cut on the surface of the plex i would say 1/4 of the way through should be enough to make sure it stays on the lines you want. then put one side of the plex on something like a table and press on the side that remains hanging over to flex that cut open. doing this in a sharp and abrupt mannor should cause the plex to snap roughly allong the lines you have cut into it. this leaves a more clear edge (except for the little bit you cut).
hack saw - yes the tried and true old school meathod. works ok but if you have alot of curvs ... well lets just say its time consumeing. again make sure your blade is very sharp. has about the same finish as with the jig saw meathod.
scroll saw - like a band saw, except the blade isn't continuous. This allows you to do piercing work - like a custom fan grill. The blades can be incredibly thin.
**********Cleaning ,polishing, scratch removal**********
Cleaning - Plex has a very soft surface as it is just plastic. Unfortunately this lends itself to scratching easly. it is best to wash and then wipe if there is some dirt on it. rather then just wipe. DO NOT use alcohol based cleaners. i have heard that this can make the plex crack. personaly i just use soap and water with a very soft cloth. try to use a clean cloth to wipe it down with. if you use a dirty one you may find soemthing stuck to it may scratch the surface of your plex.
Scratch removal - lets say you do manage to scratch the surface area of your peice. dont dispare. you might could recover. apparently there is some products for plex that you can use to remove scratches and polish it back to being clear. They have diffrent numbers associated with them depending on what they do. Try using Novus #2 (scratch remover) then polish with novus #1(...polish..) for a perfect finish.
Novus#2(RED) is the scratch remover
Novus#1(blue) is the polish
check it out
http://www.tapplastics.com/shop/product.php?pid=113&
Polishing - Again you can use the same compounds as you did in the previous section. it also works on the edge peices too after some sanding. you need to use a very high grit sand paper to flatten out and smooth the edges over. i hear once you think your done with the sand paper that you can use toothpaste to give it an even nicer finish. or instead you can use the stuff from the previous section Novus #2 then polish with novus #1. There is another method to polish the edges. this is called flame polishing. this can be tricky so i strongly suggest trying it on scraps till you get the hang of it. essentually what it entails is using the heat from a flame (not the acctuall flame itself) to soften and melt the flat part of the edge and allow it to melt down into the scratches you made while cutting out your work. best tools for this seem to be propane torches butane torches, or any other device that does not have a yellow / orange flame (leaves icky carbon on your work). you want this flame to be controled so propane torch / butain torch is perfect. WARNING! do not use flame polishing on edges that you wish to join to something else. The melting process typicaly mildly deforms the edge so it is not flat anymore makeing it more diffuclt to glue and get a good seal.
********* Glueing and afixing your plex**********
Fixing to other plastics - if you are trying to stick some plex togeather to create a complex shape you will need something to glue it togeather properly. forget crazy glue guys. here is what you want to use. IPS Weld ON #4. there is also an IPS Weld ON #3 and it is fast drying. probably best to take the longer drying kind though. most likely it does a better job.
http://www.tapplastics.com/shop/product.php?pid=131&
fixing to wood - dont know whats the best for this if i find it iw will edit this document
fixing to metal - i have experimented with epoxy and it seemed to work ok to a particular extent. the problem seemed to be when the steel flex. plex is more rigid then the lite steel used on case sideings and thusly seems to break the bond to the steel when and if the steel tries to flex. perhaps the gauge of plex i used was too thick. i think it was 1/8 inch. anyways if you do decide to glue to steal its a good idea to sand the steal with rough sand paper as well as the area of plex that will acctually be glued. this allows the glue to get a better grip on both peices. again if you know something i dont ( and you most likely do ) please share with us and i will add it to this document.
Rivoting - if you need to rivot plex to lets say steel it is better if you can use aluminum rivots. they tend to not take as much pressure to crimp and snap the end off as steel rivots. this should prevent your work peice from cracking while you apply nessasary force to pop your pop rivots. also please remember that it is a good idea to not put rivots in on the very edge of your peice. good practice is to leave a healthy area between the edge of your plex and the hole you make to rivot. for example
if this is how thick your plex is | | then you should leave about this much space | | before putting a hole to rivot. this should ensure that you dont ruin your work at its last stages and have to start all over.
Bolts - lots and lots of diffrent shapes types and sizes here folks. find one that suits the look your trying to get best. Concider countersinking your holes so that the bolt heads dont stick out. the Benifit of bolting rather then glueing or rivoting is that your plex can be removed and washed if required. i supposed you could remove the other types mentioned here but it would only create alot more work for you (have fun drilling out those rivots and not scratching your plex). one remaining thing to say is that if the excess threads on the bold stick out alot you may want to concider marking them, removeing the bolt and cutting off the extra.
********Shapeing********
preform shapes - if you heat plex up it will become plyable enough to mold it onto diffrent shapes. probably the esiest way of doing this is with the element of your electric stove at home or other simaler device(space heater maybe?, basebord heater? heat gun? my fingers after typeing this much?). essentually try to keep the parts you want to bend warm to the point that they can bend fairly freely. i tried this for the first time last night so i am not an authority on it but it seems fairly easy. i heated up the plex by holding it over the element (not touching) untill it was somewhere between rigid and playdoh. keeping it at this state allows you to form your shapes without haveing to worry about the plastic drooping too much or getting bubbles in it. by heating it, while bending it should prevent little stress cracks that later could show up as little white lines. once its warm enough you can use other objects to help you mold the shape you want. be ware of heavly textured surfaces as i think that could imprint a pattern on the surface of your plex if its hot enough. Finaly, once you have accieved the desired shape you can dunk(if its small enough) your work in cool water to harden the plex again.
this about sums it up for now. i will likely be updateing this with any new info or experiances i come accross. if you see something that is in correct or have another / better way of doing something you see here feel free to comment. if you have a tip or a trick please try to make an obvious heading at the top of your post denoteing what it has to do with for example
****** glueing******
this way people can more quickly find the things that pertain to them.
thank you for your time
here is the link to the thread i found
http://www.twistedforums.com/forums/...hp/t-1354.html
-
Re: Tips for working with plexi/acrylic
Nice article.
You might want to add that Plexiglass and Perspex are the same thing (Polymethyl methacrylate - PMMA). Perspex is the UK trade name for it. Also Lexan is similar but I believe it handles differently. Anyone more knowlegable should comment on working with lexan.
Quote:
scroll saw - i dont know what this is but i keep hearing people use it. will edit this entry to include any info someone wants to add
A scroll saw is like a powered copping saw or jewlers saw. the blade is attached to an armiture at both the top and bottom and the motor does the sawing for you - like a band saw, except the blade isn't continuous. This allows you to do piercing work - like a custom fan grill. The blades can be incredibly thin.
-
Re: Tips for working with plexi/acrylic
Very nice article. You could put something in about using a hot glue gun when attaching Perspex to metal, some people find that if you epoxy first then get the edges with the glue gun it helps to hold the thing together. It won't look reat though.
Thinking about expanding this for etchings as well? Good work so far though mate.
-Dave
-
Re: Tips for working with plexi/acrylic
Quote:
Originally Posted by Cevinzol
A scroll saw is like a powered copping saw or jewlers saw. the blade is attached to an armiture at both the top and bottom and the motor does the sawing for you - like a band saw, except the blade isn't continuous. This allows you to do piercing work - like a custom fan grill. The blades can be incredibly thin.
this sounds like an ideal tool. would allow you to cut out some very interesting shapes. any experiance using this tool? if so does it bind up alot? what blades do you use. how does it leave the edges. does it chip the surface at all. anything we should know about it like speed settings or things it dosent seem to do well with?
-
Re: Tips for working with plexi/acrylic
-
More Plex-Ed
*****Drilling
if possable use a drill press. it does a much more accurite job. the hole will pretty well always be perfectly strait and perpenddicular to your work peice. it gives you more control then an electric drill or a drimel. it seems to be a good idea to drill pilot holes and then enlarge them with a bigger drill bit afterwords. i have heard this can help prevent cracking.
*****Etching
I use a Dremel with the 1/32 adn 1/16 engraving tips. Some people also use sandpaper. I keep the dremel at a fairly low speed(either the lowest or second to lowest) I find the faster it moves the worse your mistakes are. IE when you make a mistake at highspeeds, it usually makes a big gouge in the etch. I like to just let the dremel rest in my hand, so I am not putting ANY weight down on it. Then I just wave it back and forth across the etch at a fast speed(or at least start slow then work your way faster until you get used to the tool)
-
Re: Tips for working with plexi/acrylic
i figured it would be a good idea to start pileing info up in organized places rather then have to go on safari every time i wanted to know something. just figured that while i was doing that i might as well make it easy for everyone else too.
-
Re: Tips for working with plexi/acrylic
Quote:
Originally Posted by Cannibal23
this sounds like an ideal tool. would allow you to cut out some very interesting shapes. any experiance using this tool? if so does it bind up alot? what blades do you use. how does it leave the edges. does it chip the surface at all. anything we should know about it like speed settings or things it dosent seem to do well with?
Blades are small metal blades 14-20 teeth per inch.
this is what a scroll saw looks like.
and
the Edge depends on the blade. More teeth less sanding.
-
Re: Tips for working with plexi/acrylic
its a great tutorial but i have to point out that its wrong, there different types of plexiglass with different properties.
acrylic - an all around type of plexiglass, comes in most colors but not uv reactive.
lexan - more resistant to scratching, not as many colors, expensive.
PVC - Scratch and Crack Resistant, probably the most scratch resistant of all plexiglass. comes in various colors.
Copolyester - comes in only in clear, has the highest impact strength.
polycarbonate - probably the worst form of plexiglass. scratches easily, but comes in all sorts of colors, cheap.
-
Re: Tips for working with plexi/acrylic
Quote:
its a great tutorial but i have to point out that its wrong
Actually, he's not wrong. If you re-read it, it says:
Quote:
Plexiglass, Perspex, plex, plexi, acrylic, all refer to the same chemical compound (Polymethyl methacrylate - PMMA). wich hence forth in this document shall be refered to as plex or plexi. Another compound known as lexan has a simaler appearance to plex however may handle diffrently. this document is intended for use with PMMA based products only.
Which is entirely true. Although what you've said is also right, and the information you've provided is helpful, you're not making many friends with your attitude.
Cannibal, don't be discouraged. This guide is damn useful, and i'll fill in any blanks where and when i can, as i'm sure the rest of guys will-and i'm sure thats what qoou meant as well. :)
-Dave
-
Re: Tips for working with plexi/acrylic
hey i thought the tutorial was great, i just had to point out that he was wrong in one part. no need to fight or get discouraged.
-
Re: Tips for working with plexi/acrylic
Qoou,
I must a agree with Dave.. what Cannibal said was not incorrect, nor do I think what you said was completely incorrect, except for the point where you said Cannibal was wrong, and about polycabonate.
In his opening statement he spelled it out that he was talking about PMMA based products, where as you were quoting facts about 4 other completely different compounds. And of course they would have different characteristics then PMMA based products. BTW Plexiglas, Perspex, Acrylic are name brands for Polymethyl methacrylate.
Quote:
Originally Posted by Wikipedia
Polymethyl methacrylate (PMMA) or poly(methyl 2-methylpropanoate) is the synthetic polymer of methyl methacrylate. This thermoplastic and transparent plastic is sold by the tradenames Plexiglas, Perspex, Acrylite, Acrylplast, and Lucite and is commonly called acrylic glass or simply acrylic. The material was developed in 1928 in various laboratories and was brought to market in 1933 by the German Company Röhm (GmbH & Co. KG).
You can read more about it here.. http://en.wikipedia.org/wiki/Polymethyl_methacrylate
Quote:
Originally Posted by Wikipedia
LEXAN® is a registered trademark for General Electric Company's brand of highly-durable polycarbonate resin thermoplastic intended to replace glass where strength justifies its cost.
More info can be read here.. http://en.wikipedia.org/wiki/Lexan
Quote:
Originally Posted by Wikipedia
Polyvinyl chloride, commonly abbreviated PVC, is a widely-used plastic.
Again you can read more about it here..http://en.wikipedia.org/wiki/Polyvinyl_chloride
Quote:
Originally Posted by Bayplastics
A transparent copolyester with very high impact resistance, Spectar® sheet is the brand name for extruded Polyethleneterephtalate Glycol (PETG) copolyester sheet.
And yet again.. Bayplastics and Eastman
Quote:
Originally Posted by Wikipedia
Polycarbonates are a particular group of thermoplastics. They are easily worked, molded, and thermoformed; as such, these plastics are very widely used in modern manufacturing. They are called polycarbonates because they are polymers having functional groups linked together by carbonate groups (-O-CO-O-) in a long molecular chain. The characteristics of polycarbonate are quite like those of polymethyl methacrylate (PMMA; acrylic), but polycarbonate is stronger and more expensive.
They make eyeglass lenses out of polycarbonate because they are stronger, lighter then glass lenses, and they are more scratch resistant then plastic lenses. And from experience.. polycarbonate lenses are more expensive then plastic or glass lenses as well. Which is why along with the information above, I would say that your evaluation of polycarbonate isn't completely accurate.
And of course you can read more about polycarbonate here.. http://en.wikipedia.org/wiki/Polycarbonate
So keep in mind before you say someone is wrong, it would be a good idea to make sure that you are talking about the same thing, and that you have all your facts straight.
-
Re: Tips for working with plexi/acrylic
Wow Overide, when you beat em' back, you beat em' back good.
-Dave
-
Re: Tips for working with plexi/acrylic
Quote:
Originally Posted by DaveW
you're not making many friends with your attitude.
i don't that can help make cannibal's thread better...
Anyways...
maybe i should said that he could use more info, he said earlier that all the plastics could be treated the same(besides the lexan). they cant.
Quote:
Originally Posted by CaseModGod
Plexiglass comes in many different names, colors, and thicknesses. The types are very important as some are more flexible, scratch resistant or heat retardant.
i just didnt know constructive crititsizm was a sin these days.
-
Re: Tips for working with plexi/acrylic
Quote:
Originally Posted by qoou
i just didnt know constructive crititsizm was a sin these days.
It's not .. but saying some one is wrong, is not constructive. There are better ways to go about it, rather then just saying they're wrong.
-
Re: Tips for working with plexi/acrylic
Hey qoou, i'm not trying to put you down bud. I did say that the info you provided was helpful, i'm just saying that telling someone they're wrong isn't constructive criticism. Don't take it personally, i know you meant well - but not everyone else does. It's not in what you're saying, just in how you say. I don't think you've really offended anyone, i'm just pointing out that some day someone might take your form of criticism as an insult.
Worry not, you posted back, stuck up for yourself, everyone's happy again.
-Dave
-
Re: Tips for working with plexi/acrylic
i didnt want to offend any one i just wanted to help out.
Cannibal... i apologize.
-
Re: Tips for working with plexi/acrylic
it takes a dumb man to run away,
It takes a wise man to stand up, admit he's wrong and apologise!
-
Re: Tips for working with plexi/acrylic
Quote:
Originally Posted by qoou
i didnt want to offend any one i just wanted to help out.
Cannibal... i apologize.
not concerned about it at all dude. no worries. this is all for the greater good to get this NFO out there and have people use these experiances to help them expand their creativity. the information you and overide have provided im sure will be a usefull gem to someone in the future. btw do you have any lexan if so can you fool arround with the scraps from an old project and post some info on how it behaves? i think that would be a great way to partisipate here
-
Re: Tips for working with plexi/acrylic
actually as a matter of fact i do have scrap lexan i can fool around with. i bought some at home depot the other day just for that purpose.
-
Re: Tips for working with plexi/acrylic
Quote:
Originally Posted by qoou
actually as a matter of fact i do have scrap lexan i can fool around with. i bought some at home depot the other day just for that purpose.
awesome. perhaps you can try cutting it with diffrent tools and post the results on what left a better edge what tool you used how to clean up the edges. something on bending it would be kool too. would sort of fit this thred. hope its not too small. dont burn yourself in the process ok dude. safety first.
-
Re: Tips for working with plexi/acrylic
i just got a new carbide cutter for my dremel that ive been dieing to try out.
-
Re: Tips for working with plexi/acrylic
Quote:
Originally Posted by Cannibal23
awesome. perhaps you can try cutting it with diffrent tools and post the results on what left a better edge what tool you used how to clean up the edges. something on bending it would be kool too. would sort of fit this thred. hope its not too small. dont burn yourself in the process ok dude. safety first.
http://www.thebestcasescenario.com/f...?t=2145&page=2
My work log shows a bit of cutting, bending, and flame polishing (watch the video). A guide is coming to my site, www.powerpackedpc.com, very shortly. I have a lot of professional acrylics experience so if you have any questions I can help you with that, I can be your insider, lol.
-
Re: Tips for working with plexi/acrylic
-
Re: Tips for working with plexi/acrylic
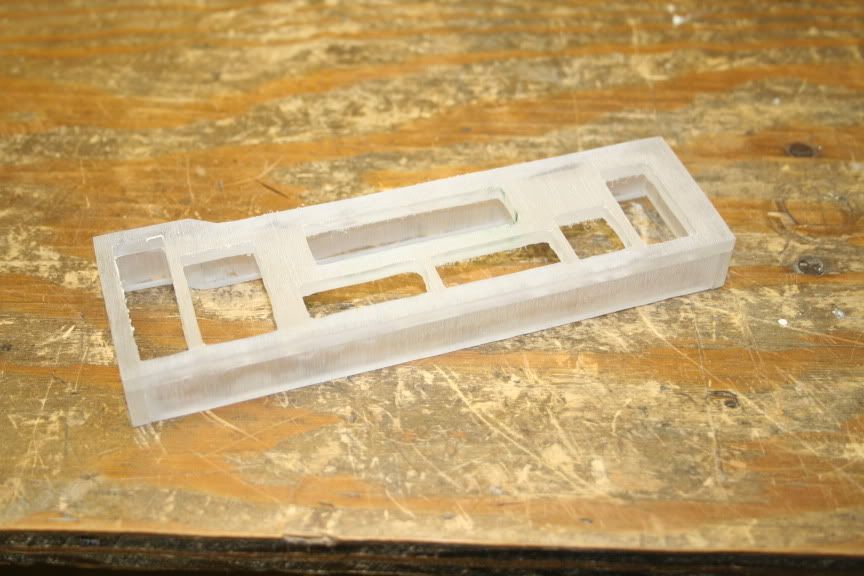
This is a great tutorial everyone, learned alot from reading it. I did my first experimenting with plexi this weekend and I just sort of walked in blind, I wasn't aware of this tutorial yet. Anyway, I found it was quite easy to work with and has limitless possibilities. I thought I would share with you how I cut mine and also raise some questions I have. First off, I forget what names you were using for which tools ( I am sure you are using the correct terms, I just get mixed up) but I use what I call a jig-saw (the one with the thin, reciprocating blade which was pictured earlier) for cutting many wood types. I use the scroll saw (hand held version of a jig-saw-is my terminology correct?) also for many woods. But for plex, I preferred the band saw for open edge cuts (we have a metal cutting blade on, an old one that doesn't matter if it gets ruined so I can cut anything with it), but found for enclosed circular cuts especially small ones, the coping saw was perfect. It's a little old school and if you haven't seen one, this is what it looks like:
The blade is about half as thick as a hack saw and the depth is usually quite shallow (my blade is maybe 2mm tops). I used it to cut I/O ports on a custom plate for the rear panel of my media center by drilling small holes and you detach the blade at one end, feed it through the hole and re-attach then you're ready to go. If doing fine, close, tiny cuts and are not comfortable using a dremel for fear of over cutting I would say this is a great option. Here is my plate:
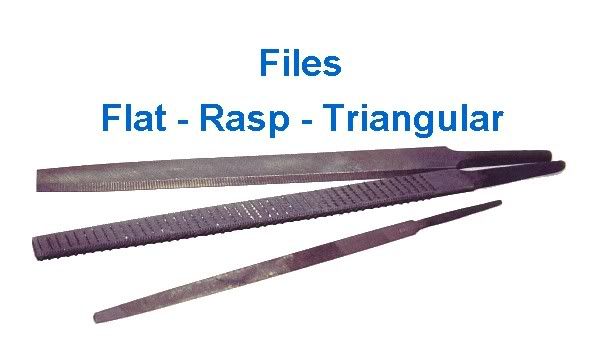
For fine tuning even beyond the coping saw, I just used typical metal files:
Now for some questions to the plexi-pros:
I wanted to know first off, if I only have clear plexi but wanted to tint it, is there an easy way of doing this? My only thoughts were colored magic marker (not likely to look spectacular), some type of thin paint, window tinting (limited colors range and I hear it doesn't stick), or glueing on a colored transparency. Any ideas on how I could do this without buying colored plexi?
Also, if you are etching on plexi and lets say drawing a letter in a word, do your grooves need to be square with the surface to look right? Or can the be concave with the surface and still look ok?
Lastly, where can you buy large sheets of it? I think i looked at lowes and Home Depot and neither had it, I had to get some from tybrennis online. But if I needed a large sheet, the shipping would be way too much?
Thanks a bunch all!
-
Re: Tips for working with plexi/acrylic
Quote:
Originally Posted by jdbnsn
I wanted to know first off, if I only have clear plexi but wanted to tint it, is there an easy way of doing this? My only thoughts were colored magic marker (not likely to look spectacular), some type of thin paint, window tinting (limited colors range and I hear it doesn't stick), or glueing on a colored transparency. Any ideas on how I could do this without buying colored plexi?
Also, if you are etching on plexi and lets say drawing a letter in a word, do your grooves need to be square with the surface to look right? Or can the be concave with the surface and still look ok?
Lastly, where can you buy large sheets of it? I think i looked at lowes and Home Depot and neither had it, I had to get some from tybrennis online. But if I needed a large sheet, the shipping would be way too much?
Thanks a bunch all!
Hey,
Magic marker will leave marker lines and look like crap. Paint is very hard to get to stick to acrylic, especially if you can't rough up the surface, since you are trying to mantain transparency. I have heard of people using window tinting, but this is not very efficient, you are limited to only what you can fit into your kitchen pot, and is hard to come by (or atleast is for me). If you are just making a case window or something, you could use a tinted film and glue it beyond the window, so the glue isn't visible.
Honestly, the easiest and probably cheapest way to get colored plexi is to just buy it as such. Here are some good suppliers I have had success with in the past:
http://www.tapplastics.com/
http://www.mcmaster.com/
http://www.delviesplastics.com/
I don't know how big of a sheet you want, but if it is too big to be UPSed, it will have to go freight, which is pricey unless buying in bulk. I personally recomend going to google maps and trying to find some plastics suppliers in your area, sign shops and fabricators usually will give away scraps or sell them very cheaply, become a regular there and they will gladly cut all your acrylic or give you some scraps.
www.maps.google.com
Type in "plastics your-city-here" or something of the sort.
Good luck.
-
Re: Tips for working with plexi/acrylic
That's a great idea, thanks again Tybrenis!
Jon
-
Re: Tips for working with plexi/acrylic
-
Re: Tips for working with plexi/acrylic
Or you can do it the TribalOverkill (look at the first few pages of Blackout) way and go to an autoparts dealer and get some adhesive window tint. Its a film that you apply and then sticks to the window. Its the same thing I'm using for my mod and hopefully will work :D
-
Re: Tips for working with plexi/acrylic
Quote:
Originally Posted by Aero
Or you can do it the TribalOverkill (look at the first few pages of Blackout) way and go to an autoparts dealer and get some adhesive window tint. Its a film that you apply and then sticks to the window. Its the same thing I'm using for my mod and hopefully will work :D
We had discussed this earlier and there is some question as to how well it sticks. Please let me know how it works for you because if it works good, I may go this route too. Thanks!
Jon
-
Re: Tips for working with plexi/acrylic
New question, how does the flame sanding thing work? I tried it on a little scrap with a butane torch and kept the flame away from the plexi using only heat, but as soon as it began to heat it bubbled and turned black. Hmmm, more practice perhaps?
-
Re: Tips for working with plexi/acrylic
Hey,
I can only give you a few tips. I assume you saw the flame polishing technique in my work log, right? Just remember to not get too close, and ALWAYS keep the torch moving. A butane torch isn't really ideal for this kind of application, professionals use a hydrogen/oxygen torch.
-
Re: Tips for working with plexi/acrylic
Yeah, I saw your worklog yesterday again which made me think to try it. Hmmm... I have a heat gun paint stripper here that I have never used before. Maybe I'll give that a go.
-
Re: Tips for working with plexi/acrylic
Quote:
Originally Posted by jdbnsn
Yeah, I saw your worklog yesterday again which made me think to try it. Hmmm... I have a heat gun paint stripper here that I have never used before. Maybe I'll give that a go.
Tell me how it goes, I've never tried using a heat gun for polishing.
-
Re: Tips for working with plexi/acrylic
Still, no luck. I used a wagner power stripper which worker better than the butane torch, but I still get bubbling before the plexi smooths out no matter how slowly I have tried. I guess I just need to keep practicing.
-
Re: Tips for working with plexi/acrylic
Hey, just tried the flame polish thing. All I had on hand was a small propane torch for soldering, but it actually turned out quite good! Not a very hot flame so it required some close contact and I made off with only one small flaw! I did the full 80/120/220/400 sandpaper routine first and that made it pretty easy. I will be posting the pics in my worklog soon, this was one area that had me a little scared but now I wanna flame polish everything!
-
Re: Tips for working with plexi/acrylic
Quote:
Originally Posted by bobthecarguy
Hey, just tried the flame polish thing. All I had on hand was a small propane torch for soldering, but it actually turned out quite good! Not a very hot flame so it required some close contact and I made off with only one small flaw! I did the full 80/120/220/400 sandpaper routine first and that made it pretty easy. I will be posting the pics in my worklog soon, this was one area that had me a little scared but now I wanna flame polish everything!
Yeah, I'd love to see your pics, I am thinking that I was not doing enough sanding. I'll follow your lead and try again.
-
Re: Tips for working with plexi/acrylic
Quote:
Originally Posted by jdbnsn
Yeah, I'd love to see your pics, I am thinking that I was not doing enough sanding. I'll follow your lead and try again.
Sounds good, but we NEVER sanded the edges when I polished them... then again, that was a professional torch. :D :D
-
Re: Tips for working with plexi/acrylic
Posted the pics in the worklog.
What I would like to know is how to cut a nice smooth edge, the edge of the panel that was cut at the Plastic shop required little or no sanding but my Jigsaw cuts were BRUTAL! I am sure I was using the wrong blade for the job as it was actually melting the Plexi and partially resealing the panels behind the blade!
-
Re: Tips for working with plexi/acrylic
Quote:
Originally Posted by bobthecarguy
Posted the pics in the worklog.
What I would like to know is how to cut a nice smooth edge, the edge of the panel that was cut at the Plastic shop required little or no sanding but my Jigsaw cuts were BRUTAL! I am sure I was using the wrong blade for the job as it was actually melting the Plexi and partially resealing the panels behind the blade!
Saw your pics, well done! As for the cutting, great question! I originally tried a table saw which didn't seem to work well, but might work better with a different blade. I use a band saw now and my cuts are much like the ones you describe and require lots of sanding. Maybe someone could throw us a bone on cutting techniques or proper blades?